“I bought a DJI O4 Air Unit. I have a DJI Remote 3. They're both DJI. Why can't I just pair them?”
Been there. Here's the short answer — and then the fix.
The O4 Air Unit is designed for custom FPV builds. It talks to your flight controller using a protocol called SBUS. The DJI Remote 3 uses DJI's own proprietary wireless signal — and the two don't speak the same language without a bridge in the middle.
That bridge is DJI Goggles 3. The RC3 sends stick commands to the Goggles wirelessly. The Goggles translate and pass them to the air unit over SBUS. No Goggles — no connection. That's the whole story.
So you have two paths. One keeps your DJI gear. The other skips the hassle entirely.
Option 1 — More Involved
DJI Remote 3 + Goggles 3
Desolder ELRS receiver, wire SBUS, bind three devices in the right order. Works well — but costs more and takes more effort to set up.
Option 2 — The Easy Way
Get an ELRS Remote Recommended
If your FPV came with an ELRS or compatible receiver, buy a remote on the same frequency and bind. No soldering. No extra hardware. No hassle.
Option 1
DJI Remote 3 via SBUS
What you need: DJI Remote 3, DJI Goggles 3, soldering iron, wire cutters.
Wire the SBUS Connection
Open your FPV and locate the O4 Air Unit cable. Plug in these two wires into the corresponding pads on the flight controller:
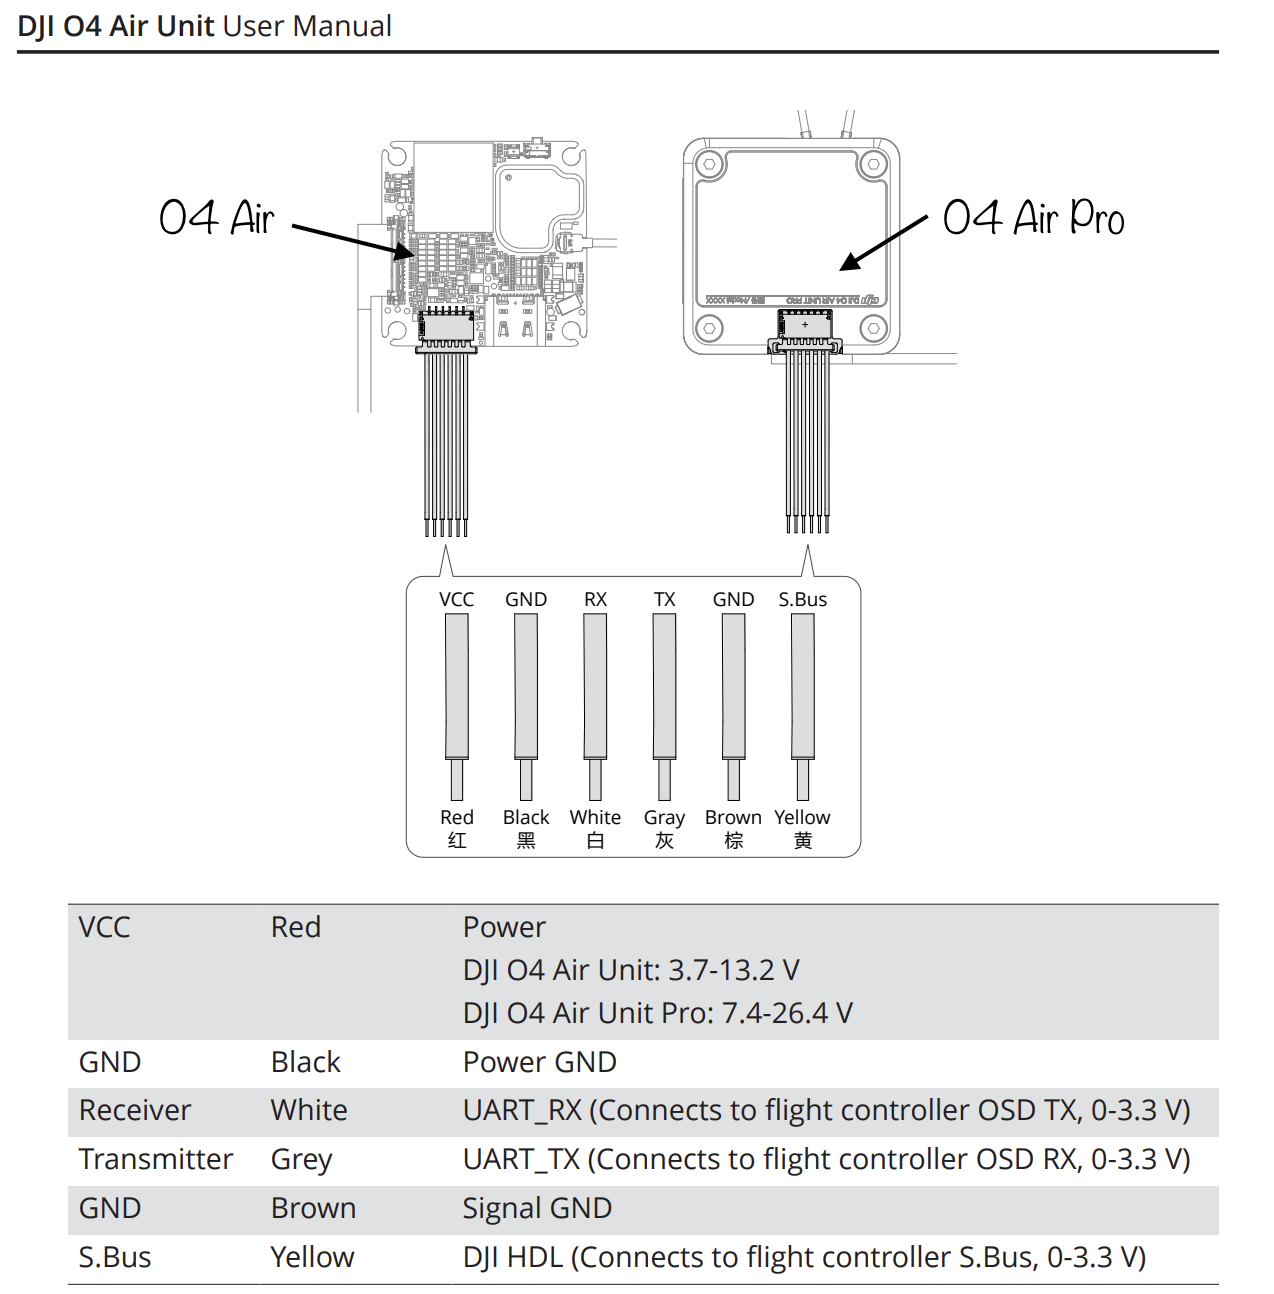
DJI O4 Air Unit — official wiring diagram (S.Bus = Yellow, Signal GND = Brown)
Step 1 — Bind Goggles 3 to O4 Air Unit (do this first)
Power on the FPV. Wait for the O4 Air Unit LED to go solid red.
Press the bind button on the O4 Air Unit — LED starts flashing.
Power on Goggles 3. In the menu go to Status → Switch, select the O4 Air Unit.
Long-press the Goggles 3 power button until it beeps continuously.
Air Unit LED turns solid green, Goggles stop beeping, video appears. Done.
Step 2 — Bind RC3 to Goggles 3 (do this second)
Long-press the Goggles 3 power button again to re-enter bind mode (continuous beeping).
Long-press the RC3 power button until it beeps.
Both devices stop beeping, LEDs go solid — bound.
Step 3 — Configure Betaflight
Connect FC to PC. Keep Goggles 3 powered on every time you open Betaflight — the FC needs the signal path active to read sticks.
Ports tab: Enable Serial RX on the UART the SBUS yellow wire is connected to.
Configuration → Receiver: Set mode to Serial (via UART), provider to SBUS. Save and reboot.
Optional — lower latency: On Goggles go to Settings → Control → Protocol → SBUS Baud Fast. Then in Betaflight CLI: set sbus_baud_fast = ON.
Check the Receiver tab — sticks should move when you move the RC3.
Option 2
ELRS Remote — The Easy Route
If your FPV came with a receiver, you just need a remote that matches it. The most important rule: match the frequency. A 2.4G receiver needs a 2.4G transmitter. A 915MHz receiver needs a 915MHz transmitter. Wrong frequency = no connection, no matter what.
Option A — Buy a Remote with the Right Frequency Built In
Option B — Buy a Remote with an External Module Bay
Some remotes (like the Radiomaster TX16S or Jumper T-Pro) have a JR module bayon the back. This lets you plug in an external TX module for whatever protocol and frequency you need — ELRS 2.4G, ELRS 915MHz, TBS Crossfire, and more. It's the most flexible option if you fly multiple drones with different receivers.
How to Bind
Put the receiver into bind mode using the 3× power cycle: plug in battery → unplug → plug in → unplug → plug in a third time. On the third power-up the LED double-blinks rapidly — bind mode is active.
On your remote, open the ELRS Lua script (System or Tools menu) and tap Bind. Or hold the physical bind button while powering on.
LED goes solid or slow-blinks. Move sticks — you should see input in Betaflight.
Deep Dive
DJI Remote 3 vs ELRS — The Full Picture
If you want to understand the trade-offs before deciding, here it is straight.
DJI Remote 3
Pros
- ✓Seamless DJI ecosystem — Goggles 3, RC3, and O4 all play nicely together
- ✓Clean, modern controller — easy to hold, intuitive for beginners
- ✓Racing mode: as low as 15ms video latency and up to 15km range on the O4
- ✓No separate receiver module to wire — the air unit handles everything once set up
- ✓SBUS Baud Fast reduces stick latency even further when enabled
Cons
- ✗Requires DJI Goggles 3 just to function — RC3 cannot connect directly to the air unit
- ✗SBUS is a one-way protocol — no telemetry back (no RSSI, link quality, battery voltage)
- ✗Video link and RC link share the same signal — lose video, you lose RC control
- ✗Goggles 3 must be powered on every time you configure in Betaflight
- ✗Requires desoldering the ELRS receiver — hardware mod that can't be easily undone
- ✗Total ecosystem cost (RC3 + Goggles 3) is significantly higher than an ELRS remote
- ✗Stick gimbals use potentiometers, not Hall-effect sensors — less precise, will wear
ELRS Remote
Pros
- ✓Works with your existing ELRS receiver — zero hardware modification
- ✓Two-way telemetry — see RSSI, link quality, and battery voltage on your radio screen
- ✓RC link is independent of video — still in control even if video degrades
- ✓Sub-2ms stick latency at 500Hz packet rate — faster than SBUS in practice
- ✓EdgeTX remotes are fully customisable — rates, curves, switches, mixer, everything
- ✓Much cheaper to get started — solid remotes from $40–$80
- ✓Industry standard for serious FPV — massive community support
Cons
- ✗Not a DJI product — if you bought DJI gear expecting a unified ecosystem, ELRS is a different world
- ✗EdgeTX has a learning curve — more configuration upfront
- ✗Budget remotes may have lower build quality gimbals
Good to Know
Things Worth Knowing About This Setup
Stuff that doesn't fit neatly in the how-to but matters when things go sideways.
SBUS is Inverted Serial
SBUS isn't a custom DJI protocol — it's an industry-standard inverted UART signal at 100,000 baud (200,000 with Baud Fast). Most modern FCs handle it natively, but older boards may need a hardware inverter.
One Signal for Everything
With DJI RC3, your video and RC signals share the same radio link. The moment signal degrades enough to break video, your FC also loses stick input and goes to failsafe. ELRS users fly on a separate RC link — if video drops, they're still in control.
The "15ms Latency" Catch
DJI's 15ms latency in Racing Mode is video latency only. Stick-to-motor latency also depends on your SBUS baud rate, FC loop time, and ESC protocol. Enable SBUS Baud Fast and DSHOT600 to actually get the most out of it.
ELRS at 500Hz
ELRS comes in 2.4G and 915MHz. 2.4G is faster and better in open air. 915MHz penetrates obstacles better and suits longer range flying. Both run at up to 500Hz — stick commands every 2ms. Your TX and RX must match frequencies.
Binding Phrase vs. No Phrase
ELRS supports a binding phrase — a passphrase baked into both TX and RX firmware so only your remote can control your drone. The 3× plug method bypasses this for quick pairing but only works if no binding phrase is set. For flying at events, a binding phrase is worth using.
Heat and the O4 Air Unit
The O4 Air Unit requires airflow to stay cool. Powered on at rest with no props spinning, temps spike fast. Always use a fan during bench work. Sustained overheating can damage the 5V regulator on your FC stack.
Further Reading
If You Want to Go Deeper
Oscar Liang's technical guide covers this setup in more detail for those who want the full breakdown:
Referenced Guide
How to Setup DJI Remote Controller 3 and O4 Air Unit in Betaflight FPV Drones — oscarliang.comCovers advanced Betaflight CLI settings, SBUS Baud Fast configuration, and additional wiring diagrams. Worth bookmarking if you go the DJI RC3 route.